Food security has never been as important as it is now. With the concern of complications arising in the food supply chain, it is no wonder that people are turning to seeds as a lifeline for the future. For years, we have put up growing guides to help beginner gardeners learn the in’s and out’s of growing their own food sources. We want to take our guides a step forward and provide a step-by-step informational primer to help walk new gardeners through gardening for the first time.
Gardening is a wonderful activity that not only creates a food source but also teaches that all forms of life need the right conditions to grow. Like human life, seeds need water, air, sunlight, and food. This guide will outline proper seed storage, the fundamentals of seed starting, planting, garden troubleshooting, and natural ways to condition the soil to provide the optimum growing environment for higher yields.
Let’s get started.
Seeds
The very first gardening step you need to take is to learn about your garden zone. Knowing what zone you are in will help you plan when to plant your garden and which plants will thrive in your area. Once that has been determined, it’s time to choose your seeds.
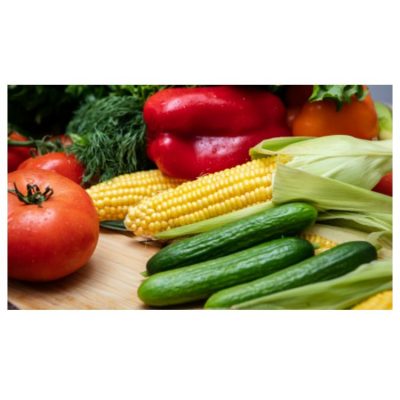
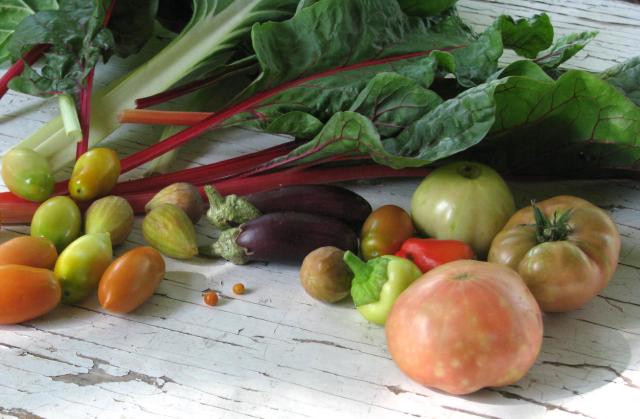
From a preparedness standpoint, look for seeds that are not only nutritious but are high in fiber and carbohydrates to help the body feel full. Potatoes, beans, and root crops have been hailed as poverty foods because of the sustenance they provide. There are many choices as to the seed type you will make. Treated seeds, untreated seed, organic, etc. From a sustainability standpoint, make a concerted effort to purchase heirloom-quality seeds. These types of seeds are bred for their flavor and not for their durability for shipping through mass distribution. Additionally, these seed types will produce fertile seeds that can be saved for subsequent growing seasons, which many sustainably-minded folks prefer.
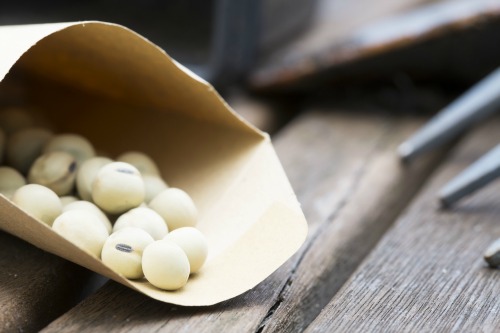
Seeds are alive, so you want to make sure that any unused seeds are properly stored away. This will allow you to use seeds for future planting. Store any unused seeds in a dry, dark place with consistently cool temperatures such as a basement or cupboard. Many like to store opened seed packets in an airtight container or plastic bag. Some seeds will benefit from having spent some time in the freezer to mimic nature’s winter freezing conditions that seeds “in the wild” go thru. (Keep in mind that the world’s most sophisticated seed banks are kept at very low temps to preserve them, and the seeds do just fine.) An interesting side note, the AGE of seeds is not always a detriment to them, because in recent history, researchers found and germinated some grain seeds found in a desert cave (hot and dry climate) that were about 2000 years old.
If you have older seeds, test their germination by sprinkling a few seeds in a moistened paper towel. Add the folded paper towel to a zip lock back and set it in a safe spot for up to five days to see if the seed germinates. If you see sprouts shooting forth from the seed, then you know your seeds are good.
Seed Starting
Seeds need three things to grow into healthy plants:
- Water – allows the seed to swell up and the embryo to start growing.
- Oxygen – so that energy can be released for germination and warmth – germination improves as temperature rises.
- Time – It takes time for a seed to break out its shell to begin growing. The average germination period is between 5-14 days.
Simply by providing seeds with comfortable temperatures, adequate soil moisture, and time, your plants will establish strong root systems and, in time, grow big enough for replanting.
If you are looking to get a head start on your garden, you can start seeds between 4 to12 weeks before the last average spring frost in their area. Follow these steps for a step-by-step guide on starting seeds indoors. As well, the key to healthy growing plants is ensuring the growing medium or soil is balanced. A healthy seed starting mix provides an optimum growing environment. A good seed starting mix is light, well-screened materials to promote root growth. By doing so ensures that the mix doesn’t compact in small seed starting cells/containers. This is my favorite mix that I use.
Some seeds like to be directly sowed into the garden. Direct seeding or direct sowing means that you start planting seeds in the garden, rather than starting seeds indoors earlier and transplanting them outside. Many seeds of both flowers and vegetables can be started outdoors, at the start of the growing season. Here are 10 of the best vegetable seeds that love to be directly sowed.
Golden Bantam Corn
Danvers Carrots
Hales Best Cantaloupe
Green Lincoln Peas
Pickling Cucumbers
Green Beans
Rainbow Swiss Chard
Bunching Onion
Bloomsdale Spinach
Zucchini Summer Squash
What I like about directly sowing seeds is it’s a no-fuss method to getting your garden started. As long as the soil is warm and moist, seeds can be sown and it will germinate quickly. Mid-spring to early summer (April-June) is the best time to get your seeds in the ground. The secret to success is to prepare a good seedbed, free of weeds and with loose soil.
With your seed plans in place, now it’s time to determine how much space you will need.
Space
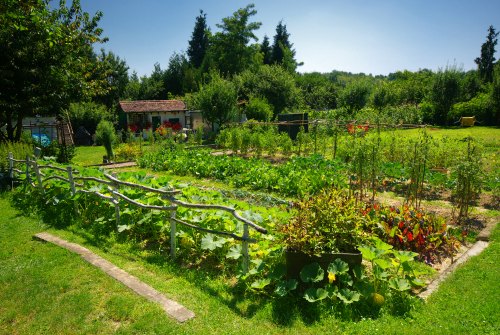
TAsk yourself, do you have a sunny patch of earth in your backyard? Or, are you looking to utilize container gardening on the patio? Ideally, you want your garden space to be able to have at least 6 to 8 hours of direct sunlight a day without blockage from trees, shrubs, or fences in order for fast-growing vegetables to grow.
How Much Space Do You Need?
In the 1970s, research by John Jeavons and the Ecology Action Organization found that 4000 square feet (about 370 square meters) of growing space was enough land area to sustain one person on a vegetarian diet for a year, with about another 4000 square feet (370 square meters) for access paths and storage. The math works out to a garden plot around 80 feet x 100 feet (24m x 30m).
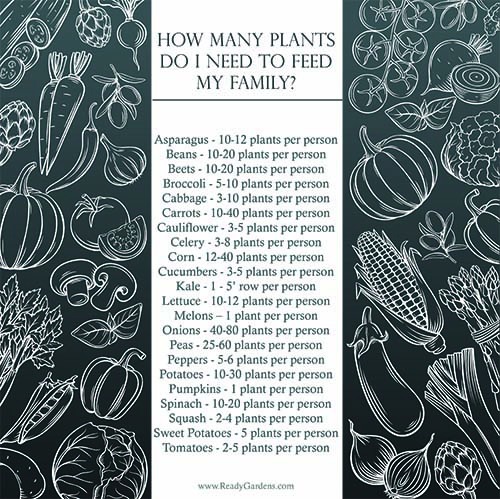
After determining if you have enough space (calculate more for a larger family) you should also calculate how many pounds of each vegetable you consume as a family in one week. This will give you an idea of what you should be trying to grow and how much. For example, if you eat 5 lbs (about 2kg) of potatoes each week as a family, that’s 20 lbs (9kg) a month and 240 lbs (109kg) a year. You’ll need to grow at least 240 lbs, plus a little more to make up for any loss of plant to disease, pests, and other often unforeseeable problems.
Urban and suburbanites can garden in smaller spaces using some of the most popular vertical gardening and small space gardening techniques:
- Vertical gardening systems
- Window boxes
- Grow bags
- Ceramic containers
- Hanging planters
- 5-gallon buckets
Ensure that your pots and containers have adequate drainage holes at the bottom. Plants do not like to sit in soggy soil and will quickly develop root rot, as a result. Plant shallow-rooted plants such as small herbs, green leafy vegetables, strawberries, and green onions which can be grown close to one another and will help plant roots stay shaded from the hot sun. This is a principle of xeriscaping and will also help to cut down on watering.
What Types of Plants Grow Well In Containers?
Growing compact plants with smaller root systems is another way to garden in small spaces and make use of container planting. Depending on the container size, plants like lettuce, spinach, chards, radish, green onions, most herbs, and berries can be planted in groups thus cutting down on space. On a side note, herbs such as oregano, rosemary, thyme, lavender, and sage grow well in containers and many herb varieties do not need to be replaced each season, thus making them wonderful additions to a year-round patio garden.
Some vegetables have deep root systems and would have the best chance at yields if planted in a single container. The following is a list of seasonal plants that grow well in containers:
Fall/Winter
- Greens such as lettuce, spinach, mustard greens, kale
- Cabbage
- Broccoli
- Carrots
- Turnips
- Onions
- Garlic
- Radishes
- Potatoes
- Most herbs
Spring/Summer
- Tomatoes (requires staking)
- Peppers
- Cucumbers (requires a trellis)
- Green beans
- Fruit trees
- Berries
Yard Gardens
If you plan on using space in your yard, this author recommends the square foot gardening method laid out by Mel Bartholomew for first-time gardeners to learn how to utilize every inch of space in the garden. You will be surprised at how many vegetables you can grow using this method. In the past, we have tried different gardening methods (straw bale, and pallet gardening in particular) but have found low success compared to the square foot method.
Once you have a garden spot in mind, it’s time to prepare the soil. We highly recommend sheet mulching (AKA no-till gardening or lasagna gardening) as a way to layer the soil and feed it for high yields. No-till gardening, sheet composting, or lasagna gardening is a gardening method that builds the soil on top of the already existing soil. More notably, it does not disturb the existing soil, but only enhances it by adding layers. Essentially, before plants are planted into the ground, a miniature compost pile is layered beneath to decay over time and supply the plants with needed nutrients once the root systems grow. This is a very efficient method (because it works with the natural decomposition process already in nature) to gardening, builds the soil to create a welcoming environment for friendly insects such as earthworms, as well as creates a living soil that will benefit your plants or vegetables. No-till gardening works with nature instead of against it. This is a type of whole-system approach to gardening that helps feed the soil while vegetables and crops are growing. If you do this each season, it cuts down on fertilizer and mulch costs and provides you with great soil.

Gardening Troubleshooting
We all have the best intentions when we start growing seeds but can run into challenges along with way. There are not many gardeners out there that have a 100% success rate with their gardens; many go through a lot of trial and error along the way. Some of the most common garden problems are:
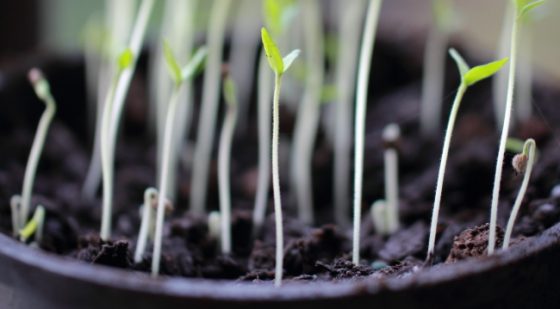
Leggy Seedlings – Newly emerged seedlings can become leggy and barely able to hold themselves up due to different environmental conditions such as lack of sunshine, moisture, or improper temperatures could be the culprit, but it can be fixed! This guide will help you understand what went wrong and how to fix it.
Poor Soil – Viable soil is the key to a successful harvest. Investing your time into ensuring the soil is healthy is a wise investment on your part, and surely an investment where you will indeed help you reap what you sow. As stated above, sheet mulching will help with this, but another way to add nutrients to the soil is through composting. Each growing season you can condition the soil by adding a few inches of compost. Feeding the soil, in turn, feeds your plants. There are many benefits to using compost as a soil conditioner. The end result of composting is a nutrient-rich soil that will hold water, allows for airflow, controls erosion, and creates a home for the bacteria that protect plants against disease, captures airborne nitrogen, lures soil-enriching earthworms. In addition to the benefits to the soil, composting cuts down on greenhouse gases as well as naturally discards certain organic materials that would otherwise be thrown into a trash can.
Watering – To keep plants healthy, water only when the soil feels dry. The best way to determine when to water is to insert your index finger 2-3 inches into the soil. If the soil feels dry, it needs water. If it is still moist, then it can go another day until it needs to be watered. As the summer months drag on, you will need to water more frequently to keep the soil moist. Take caution not to over-water. By doing so, the roots become waterlogged and diseases can grow, the roots will rot, and the plant can die. Signs of overwatering are the plants’ colors dull and turn yellow, then become soft and break easily.
Insects – Just when your garden really gets growing, you might begin noticing munched on leaves, leaves curling or falling off, dark green dropping on leaves, or stem damage. These are all signs of insect damage. Garden pests can quickly destroy a thriving garden. There are many natural ways to prevent these infestations. For instance, insecticidal soap or neem oil is very effective in preventing further garden attacks. In addition, you can plant trap crops to distract insects. A trap crop, also known as a sacrificial crop, is a plant that you add to your garden to attract pests away from the main crops you are growing. Read more here.
Fertilize – Some plants require lots of nutrients in order to grow. Corn and tomatoes are voracious when it comes to needing nutrients during their growing period. Usually, a balanced fertilizer is applied every three to four weeks throughout the growing season. Don’t stop applications when the fruit appears—continue to apply fertilizer as needed to ensure continued production. Read more applying fertilizers here.
Adding compost to soil can also help provide nutrients to the soil. Another option is compost tea. Compost tea takes the beneficial bacteria and fungus present in compost and exponentially increases them through aeration and sugars. These bacteria and fungus are critical in root establishment – and the more bacteria you have in your soil, the better. In fact, if you diversify your bacterias, you will make healthier soil and compost tea is one of the easiest ways to do this. This is my favorite way to make compost tea.
Mulch During Hot Months – Mulching the roots is a trade secret many successful gardeners use to protect the plant’s delicate root structures and prevent weeds from growing. You can use fallen leaves, straw, wood chips, or newspaper to shade the roots. This will keep the roots moist and not stress the plant out during the warmest parts of the day. As well, the natural mulch will compost down over time and help your soil in the process.
You don’t have to run to your garden center and spend a small fortune on these organic mulches, many of these you may have around your yard. Here are seven excellent mulches that will keep your garden thriving!
- Grass clippings – Rather than throwing away your grass clippings after you have mowed this lawn, use them to your advantage. This natural mulch will also return nitrogen back to the soil, thus feeding your soil an essential nutrient to keep plants growing. This is also a great addition to lasagna gardens.
- Pine needles – Many of us having a plethora of pine needles and may not realize these make a great mulch. Despite what you may have heard, pine needles will not change the acidity of the soil. They are an ideal mulch because they provide uniformity to the beds, easily allows water to pass through, and create air pockets that is beneficial for the soil.
- Straw – Straw is an ideal mulch that really does everything an organic mulch should do: retains moisture, reduces weeds, and adds organic matter to the soil when it breaks down. Make sure you purchase straw that is weed-free.
- Shredded leaves – Leaf mulch is a great way to utilize fallen leaves. Read more about which leaves are best for mulch. These make wonderful mulches and have a slow decomposition process. An electric leaf mulcher will chop leaves to a suitable length and cut down on time. Note: Leaves of the black walnut tree (Juglans nigra) are an exception due to the presence of juglone, a chemical that inhibits the growth of many plants. While walnut roots and hulls cause most of the problems, the leaves also contain smaller quantities.
- Wood chips – By far, wood chips are one of the most popular types of natural mulches. These are readily available at your local garden center, but if you happen to have a downed tree from a storm, make the most of it and retain some of the bark for wood chips. Also, contact local tree-care companies to see if they would be willing to sell you a trunkload of chips at a nominal price.
- Newspaper – This is a frugal mulch choice for your garden and a great way to reduce weeds. Using 2 to 4 layers of newspaper strips is great for use in pathways and around newly set strawberry plants. It’s best to use another organic mulch in addition to newspapers, such as sawdust or hay, to hold the paper in place.
- Living mulches – A living mulch a low-growing plant used in the vegetable garden as a mulch. It is often a companion plant. Some of the most favorite types of living mulches are clovers, hairy vetch, alfalfa, and ryegrass. Once the garden is put to rest, the living mulch can either be tilled into the soil or harvest and fed to livestock like rabbits or chickens as a treat.
By far, mulched gardens are healthier, contain fewer weeds, and are more drought-resistant compared to gardens that are not mulched. Done properly, this will make for a more efficient gardening experience and keep you from fighting weeds and pests. Make the most use of the items you have around you and utilize them in garden beds and landscaping rather than throwing them away.
Attract pollinators – Pollinators like bees and hummingbirds are ideal for assisting in the pollination process. Providing them with brightly colored perennial flowers like echinacea, roses, flowering herbs, and feeders will encourage their presence. Here are 5 beneficial insects you want in your garden.
Related: Time-Tested Tips For Growing a Successful Garden
Practice
Successful gardens require continued practice to achieve the results that you want. If you provide young plants with the desired growing environment, they will reward you with fresh fruit kissed by the sun. And there is nothing like fresh fruit and vegetables right from the garden.
Proper planning each season will help you cut down on gardening chores and prepare the garden for planting.
The Gardener’s To-Do List for Fall
To-Do List for the Spring Garden
If your garden doesn’t do well the first year, don’t give up! Keep trying. Each year, you learn more about how to grow vegetables. It also helps to talk to other gardeners and learn tips and tricks from them.
Many gardeners are striving to reach a point where they are free from running to the grocery stores. They want food freedom and are actively taking steps to embrace this sustainable lifestyle. Using the tips above will help you achieve this. Equipped with these gardening fundamentals will help you find security in your food.
Prolific yields will give you enough food to feed your family and put some away for times when you need it the most. All it takes is a single step of planting a seed.